
Status: maintained; 2016-present
This page describes my procedure to modify the most advanced truly wireless earphone models for maximum noise isolation (as well as secure and comfortable fit) using Comply P-series foam tips and custom molds. Details are provided for the Nuheara IQbuds2 MAX (which has the best functionality and is still being manufactured) and the obsolete Doppler Labs Here One and Bragi Dash, Headphone, and Dash Pro. You can try this for yourself; read on for details. You can discuss this on on the Reddit thread (for the IQbuds2 MAX) or send me feedback by email.
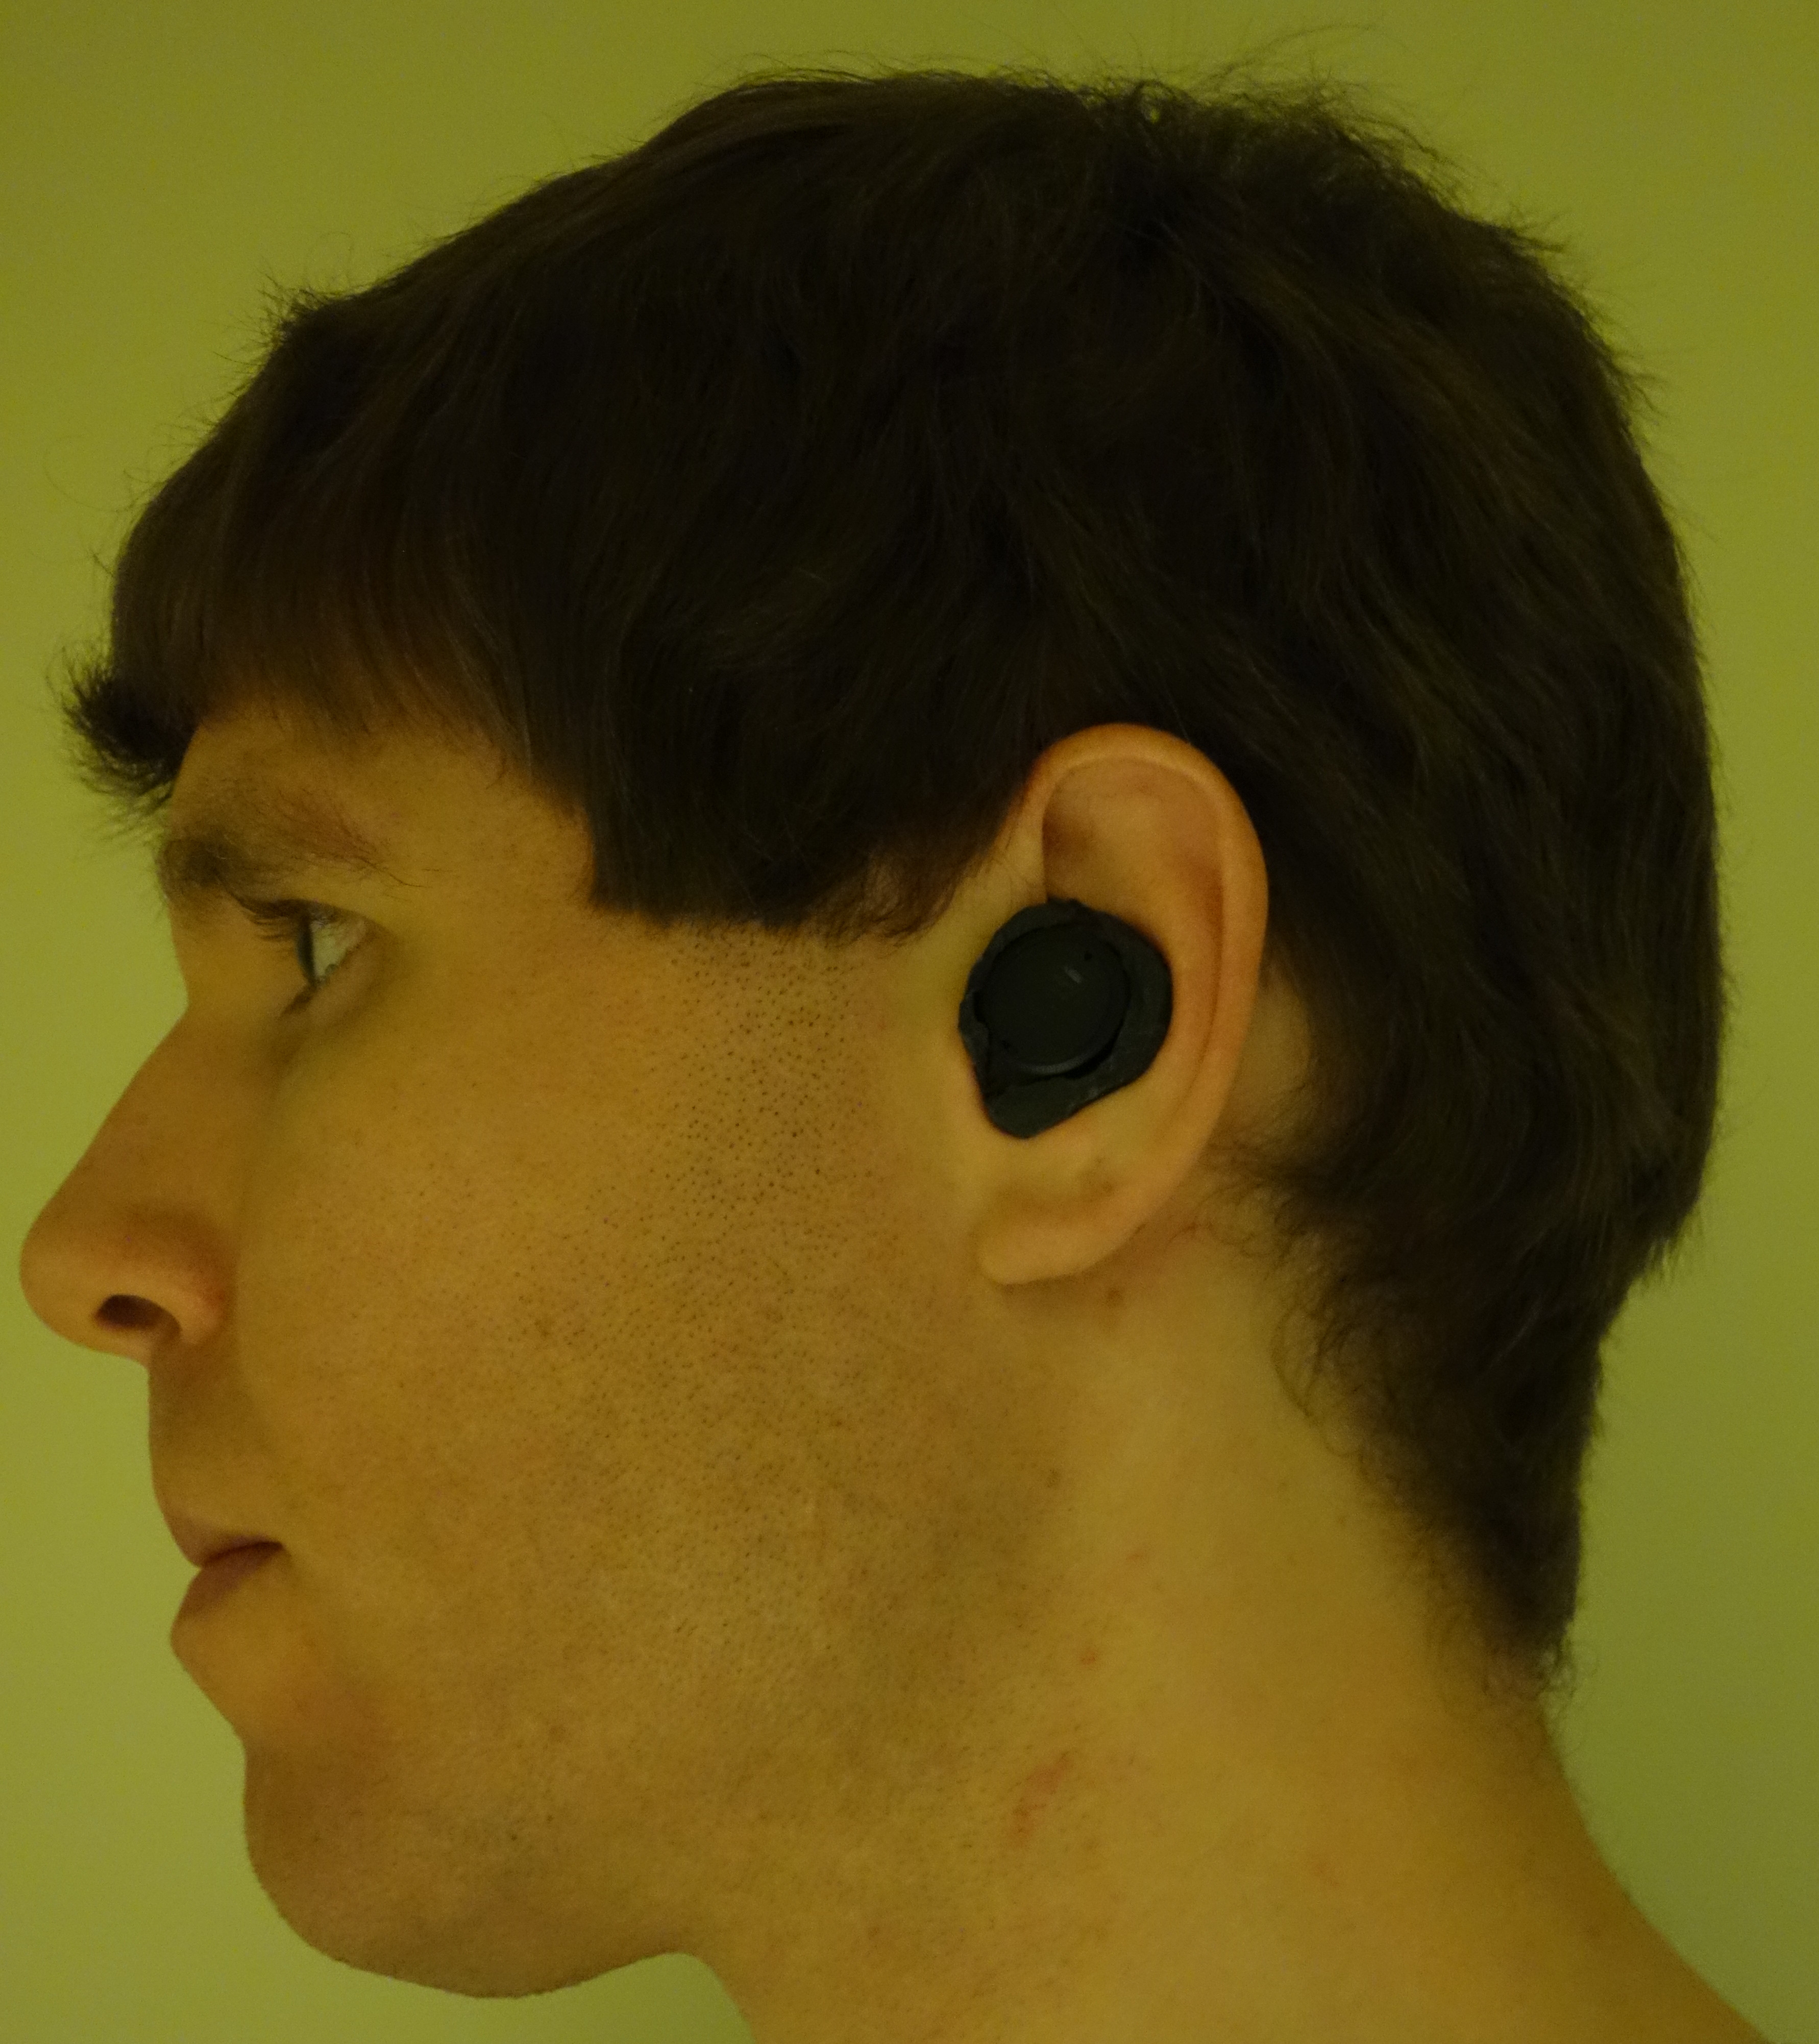
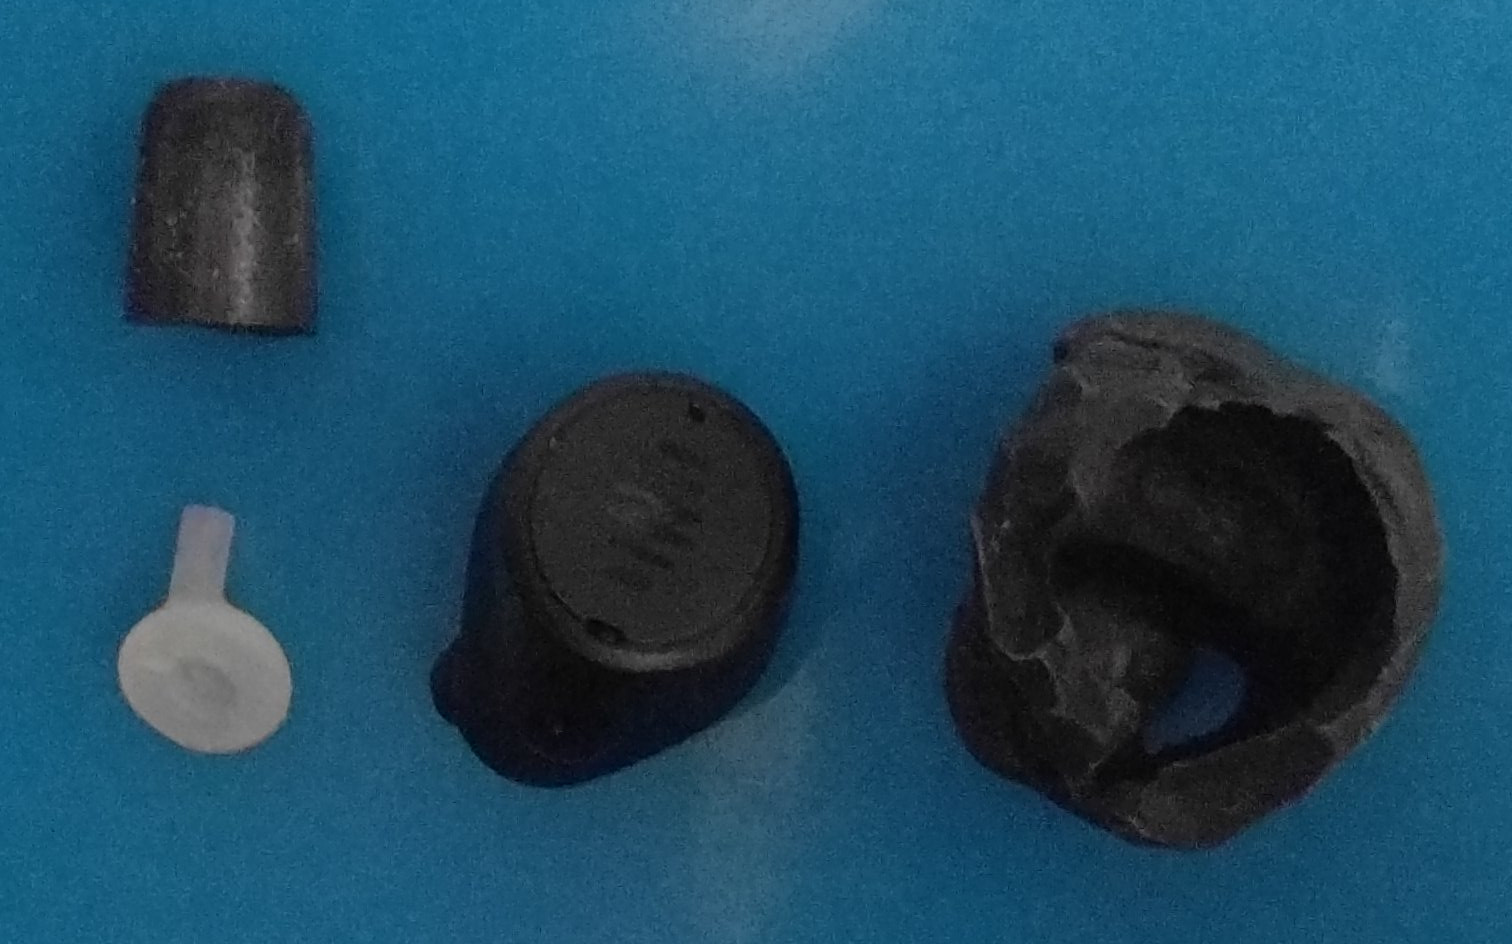
Here are the photos for the IQbuds2 MAX (click each one for a larger photo):
I realize this page is becoming cluttered with information about the old earphone models that may make it harder to find what is relevant to the IQbuds2 MAX. For now (2020-09-11), I want to keep the old information available, but I may eventually find a better solution. I have, however, moved the photos for the old models to another page to save space.
I appreciate earphones with excellent noise isolation: they make it possible to hear audio in good quality at moderate volume, and I can leave them on with no audio playing just to block outside sound, since I'm easily bothered and distracted by noise. (I prefer the in-ear form factor for the light weight and portability.) I was lucky to stumble upon Comply P-series foam tips in 2008 and have used them with compatible earphones ever since. Note that Comply "Canal Tips" are an identical product available in larger quantities at a lower unit price. The unit price (at best, $4/pair for 100 pairs) is still high given that I quickly get the tips sweaty enough that they are unappealing to wear. I've tried two less expensive kinds of foam tips of similar shape and size (Westone True-Fit and ISOtunes), but both types made my ears hurt for reasons I don't fully understand.
Since 2012, my preferred wired earphone model has been the Shure SE115 (and its successor the SE112) for the excellent fit and isolation at a reasonable price. As lightweight wireless earphones began to become widely available, I was interested in their convenience, but the prospects for achieving the level of noise isolation I wanted did not seem good; part of the problem may be that my ears have an unusual shape. In addition, putting on earphones with foam tips takes both hands and about 15 seconds to get a proper fit, and it felt tedious to take the earphones off and put them on again if I wanted to hear the outside sound for a brief period such as a transfer between two segments of a public transit trip.
Finally, the Bragi Dash emerged in February 2016; it is "truly wireless" (two earbuds with no wire between them) and has the ability to feed through the outside sound ("transparency"), which can be switched on and off without removing the earbuds. I decided the advantages were compelling enough that I would buy a Dash set and attempt a custom modification to get the level of isolation I wanted: 3D-printing an adapter for Comply tips, as suggested by a commenter on the forum. I made significant progress toward a satisfactory long-term solution for the Dash, but before I got there, I moved on to the Doppler Labs Here One for its additional noise filtering features. I reached a good solution in late May 2017, but then Doppler Labs went out of business in December 2017, meaning there would be no more enhancements, and the batteries on my Here One sets wore out as replacement sets for sale became harder to find. Finally in June 2020, the Nuheara IQbuds2 MAX started shipping, and in July 2020, I successfully applied the same approach. On 2020-09-11, I have finally added the information to this page. I highly recommend the IQbuds2 MAX, although as of 2020-09-11, you'll still have to wait a while for your order.
I'm excited to publish my procedure to offer what I hope will be a good solution to people with similar needs while we wait for manufacturers to prioritize providing maximum isolation for a wider range of ear shapes out of the box. This page describes my complete designs for the IQbuds2 MAX and Here One as well as my design for the Dash at the point that I stopped working on it (which I believe also applies to the Bragi Headphone and Dash Pro since they have the same shape). Similar techniques may work for other earphone models. If you don't specifically want the best noise filtering and hearing augmentation features, I suggest you first check for an earphone model that meets your noise isolation and other needs using only off-the-shelf parts before attempting a custom modification, although as of 2020-09-11, I am not aware of any truly wireless earphone model that supports Comply P-series or comparable tips using only off-the-shelf parts. Comply advertises shorter tips for many truly wireless earphone models, but they don't provide the level of isolation that I want.
I've described the main pitfalls I'm aware of, but use of this procedure is ultimately at your own risk. My experience so far suggests that you should be prepared for several rounds of trial and error at a cost in time and money, though hopefully fewer than I went through. Good luck, and please let me know how it goes so we can provide better information to future users!
As I understand it, once an earphone blocks direct airflow into the ear canal, its (passive) noise isolation is determined by how tightly it grips the ear canal. Incoming sound waves cause the whole earphone to vibrate, including the side that faces the ear canal, transmitting some sound into the ear. The tighter the grip, the less the earphone vibrates and the less sound is transmitted.
A good grip starts with the use of a long foam tip such as the Comply P-series tip in the ear canal. Then the earbud itself has to be secured tightly to the foam tip with an adapter that holds the earbud in the desired place in the ear. (The tips of the IQbuds2 MAX, Here One, and Dash are too wide to fit into a Comply P-series tip directly, and in any case, the angle would be wrong for my ears.) For the IQbuds2 MAX and Here One adapters, I added a wide, rounded surface that presses against the bones inside my ear to tighten the grip, similar to the way the body of the Shure SE112 does, and this noticeably improved the isolation. (My adapter for the Dash does not have this feature, but I see no obstacle to backporting the feature.)
Finally, a custom mold secures the earbud in the concha of the ear. I found that when I use the wide adapter base, adding the mold improves the noise isolation only marginally, but it helps avoid pressure points and distracting looseness, and I like the more secure fit. Without the wide adapter base, the mold does significantly improve noise isolation. (The Dash fit sleeves serve the same purpose as the mold, but they won't fit as well as a custom mold, and in my case, all of the provided fit sleeves hold the earbud in such a position that the adapter doesn't fit in my ear.)
You can try a custom mold in combination with silicone or foam tips that fit directly on the earbud (such as the supplied ones), and for a relatively low cost in time and money, you may get somewhat better isolation than with the tips alone. I needed the adapter to get the level of isolation I wanted.
With the assembled IQbuds2 MAX (and Here One) earpieces, casual tests in different noisy environments suggest that I'm getting isolation close to that of my standard, the Shure SE112, though I haven't tried to get access to the equipment to make precise measurements. (The active noise cancellation of the IQbuds2 MAX provides additional noise reduction for the sounds it is designed to target: low frequencies, if I understand correctly.) The earpieces are comfortable enough to wear for at least a few hours at a time. They look a bit awkward sticking out of my ears; that's the price I pay for truly wireless earphones with good battery life and feed-through of good enough quality that I can avoid taking them off. I don't know if it will be possible to miniaturize the earphones much further while retaining those features.
With the IQbuds2 MAX, the molds block the sensors that detect whether the buds are in your ears, causing the buds to conclude that they are never in your ears. This has several effects: (1) the buds start in ANC mode rather than World On, (2) the voice feedback ("world off", etc.) is shut off, and (3) the touch controls do not function. (Even in firmware version 1.1.0, the new switch for touch controls in the app only allows touch controls to be turned off when the buds detect they are in-ear, not to be turned on when the buds detect they are out-of-ear.) I have not found any other functionality to be affected. I like #2 because I find the voice feedback annoying, and #3 is usually not a great loss with my current use patterns; an exception to the latter is when the IQbuds2 MAX are connected to an audio source other than my phone and I cannot use the control app at the same time (more about this). I could probably cut holes in the molds so the buds would detect they are in-ear, but the harm of the voice feedback would outweigh the gain of the touch controls. I have now submitted an enhancement request for an option to turn off the voice feedback while the buds are detected in-ear.
The adapters and molds have to be removed each time the earbuds are put in the case for charging and reattached when the earbuds are used again. (The foam tips can remain on the adapters.) You can store the extra parts in a small drawstring bag or case. (The IQbuds2 MAX conveniently come with a generously sized drawstring bag for no reason obvious to me; it's great for this purpose.) The assembly and disassembly gets tedious, but compared to maximum-isolation earphones that don't have switchable feed-through, your trouble is paid back as soon as you use feed-through once or twice in situations in which you would have taken off the other earphones and had to reinsert them properly.
To reduce the assembly burden, when you take the earpieces off, you can leave them assembled outside the case. With the IQbuds2 MAX, if you have "world off" and touch controls disabled as above, this is mostly harmless: I did one test in which a full battery charge lasted about 10 hours in this mode, although of course I expect the battery capacity to degrade over time. The only significant problem is that if you have your phone connected for calls and you receive a call, it will go to the buds; if this happens, you need to be prepared to quickly disconnect your phone or switch it to the internal speaker and microphone. (Android has the option to disable the use of a Bluetooth audio peripheral for calls while leaving it enabled for audio playback, as well as a button to switch audio from Bluetooth to the internal speaker and microphone during a single call; I'm not familiar with the iPhone.) With the Here One and Dash, leaving the earpieces outside the case is not as practical because the battery drains quickly and for the Here One, there is no way to stop an accidental bump to the touch controls from turning on bypass mode and causing loud feedback. In contrast, the Headphone can be switched completely off outside the case.
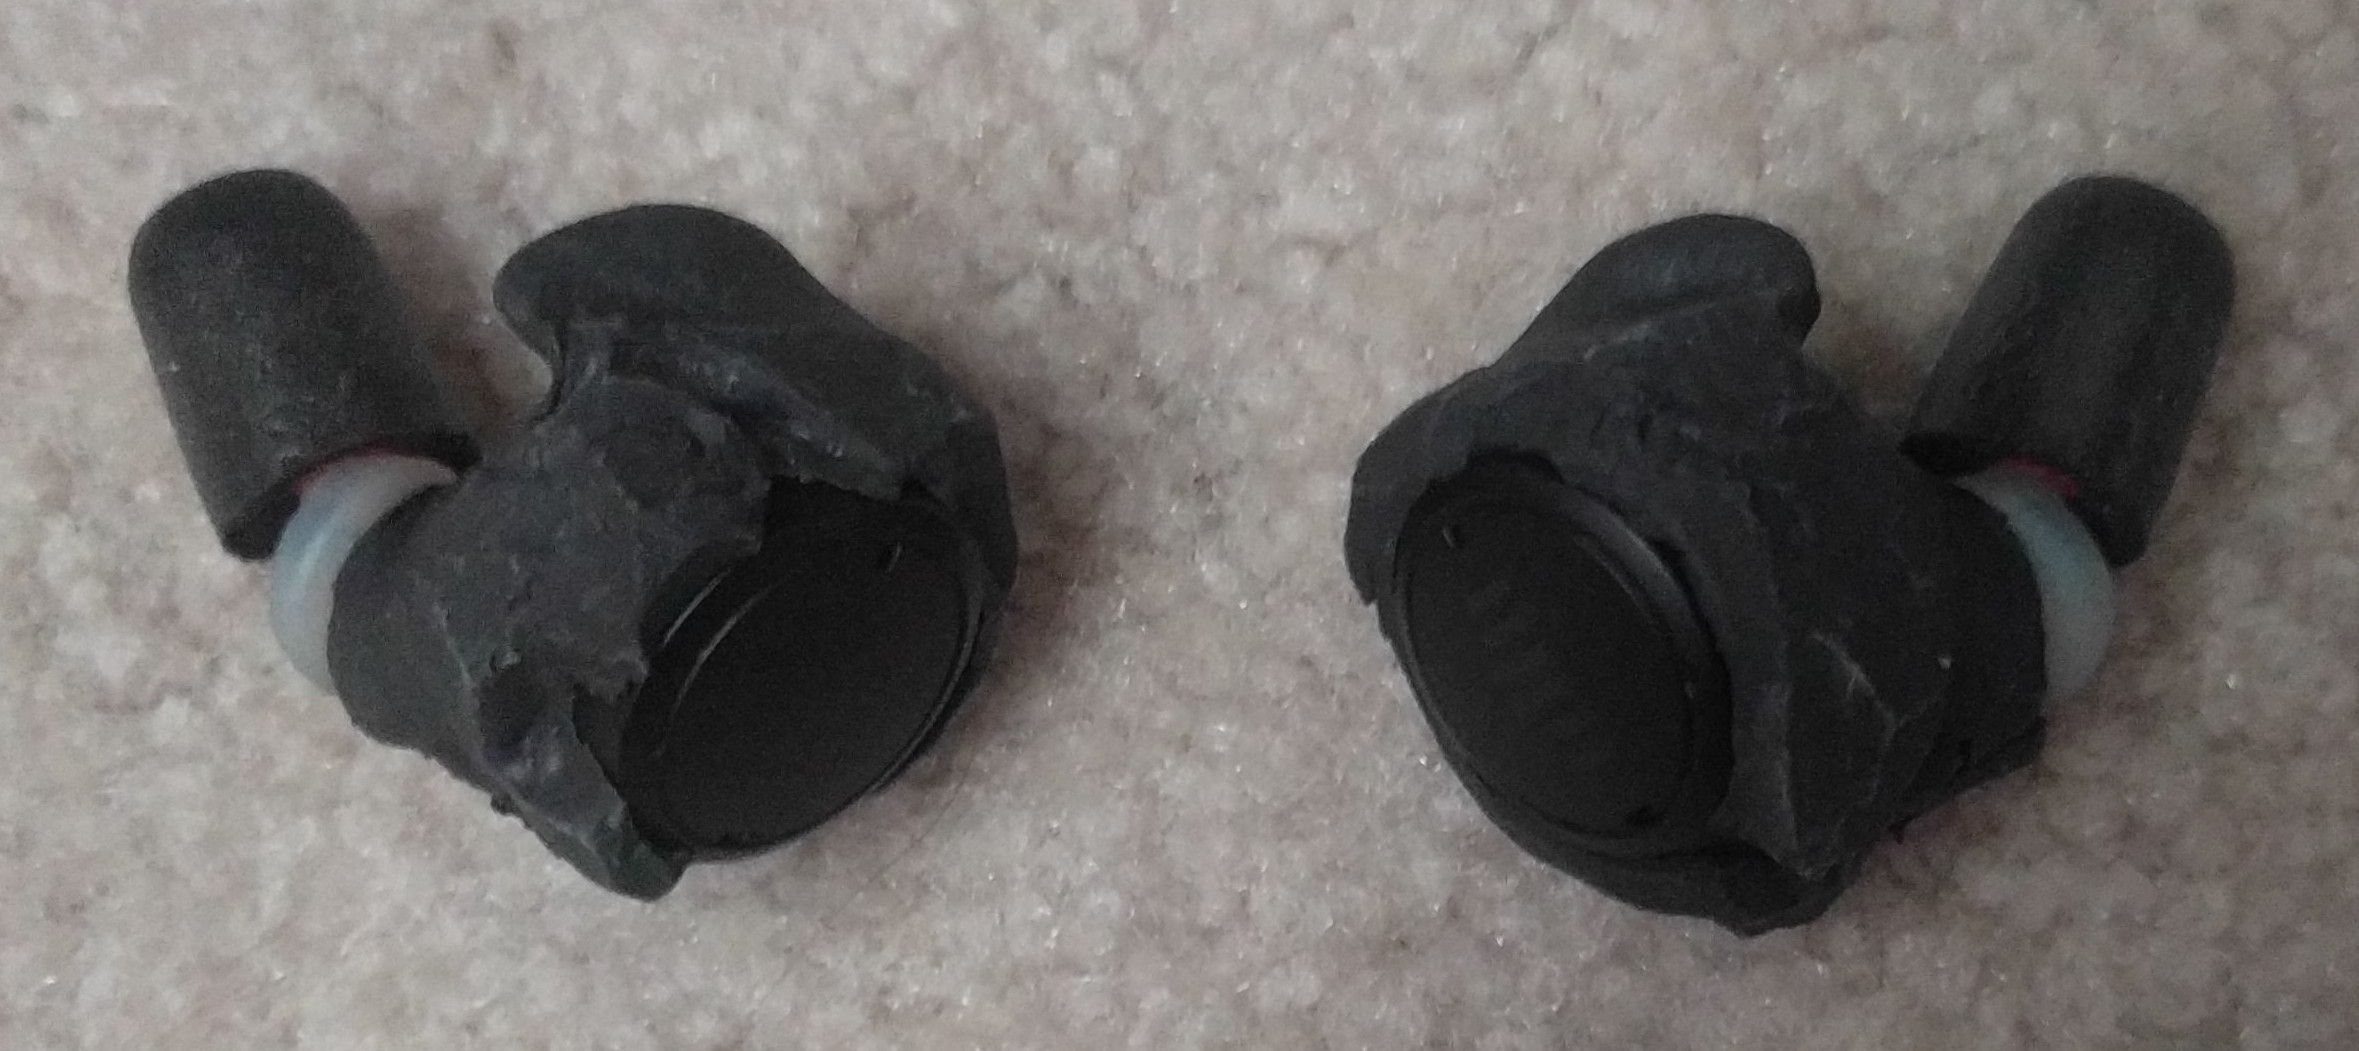
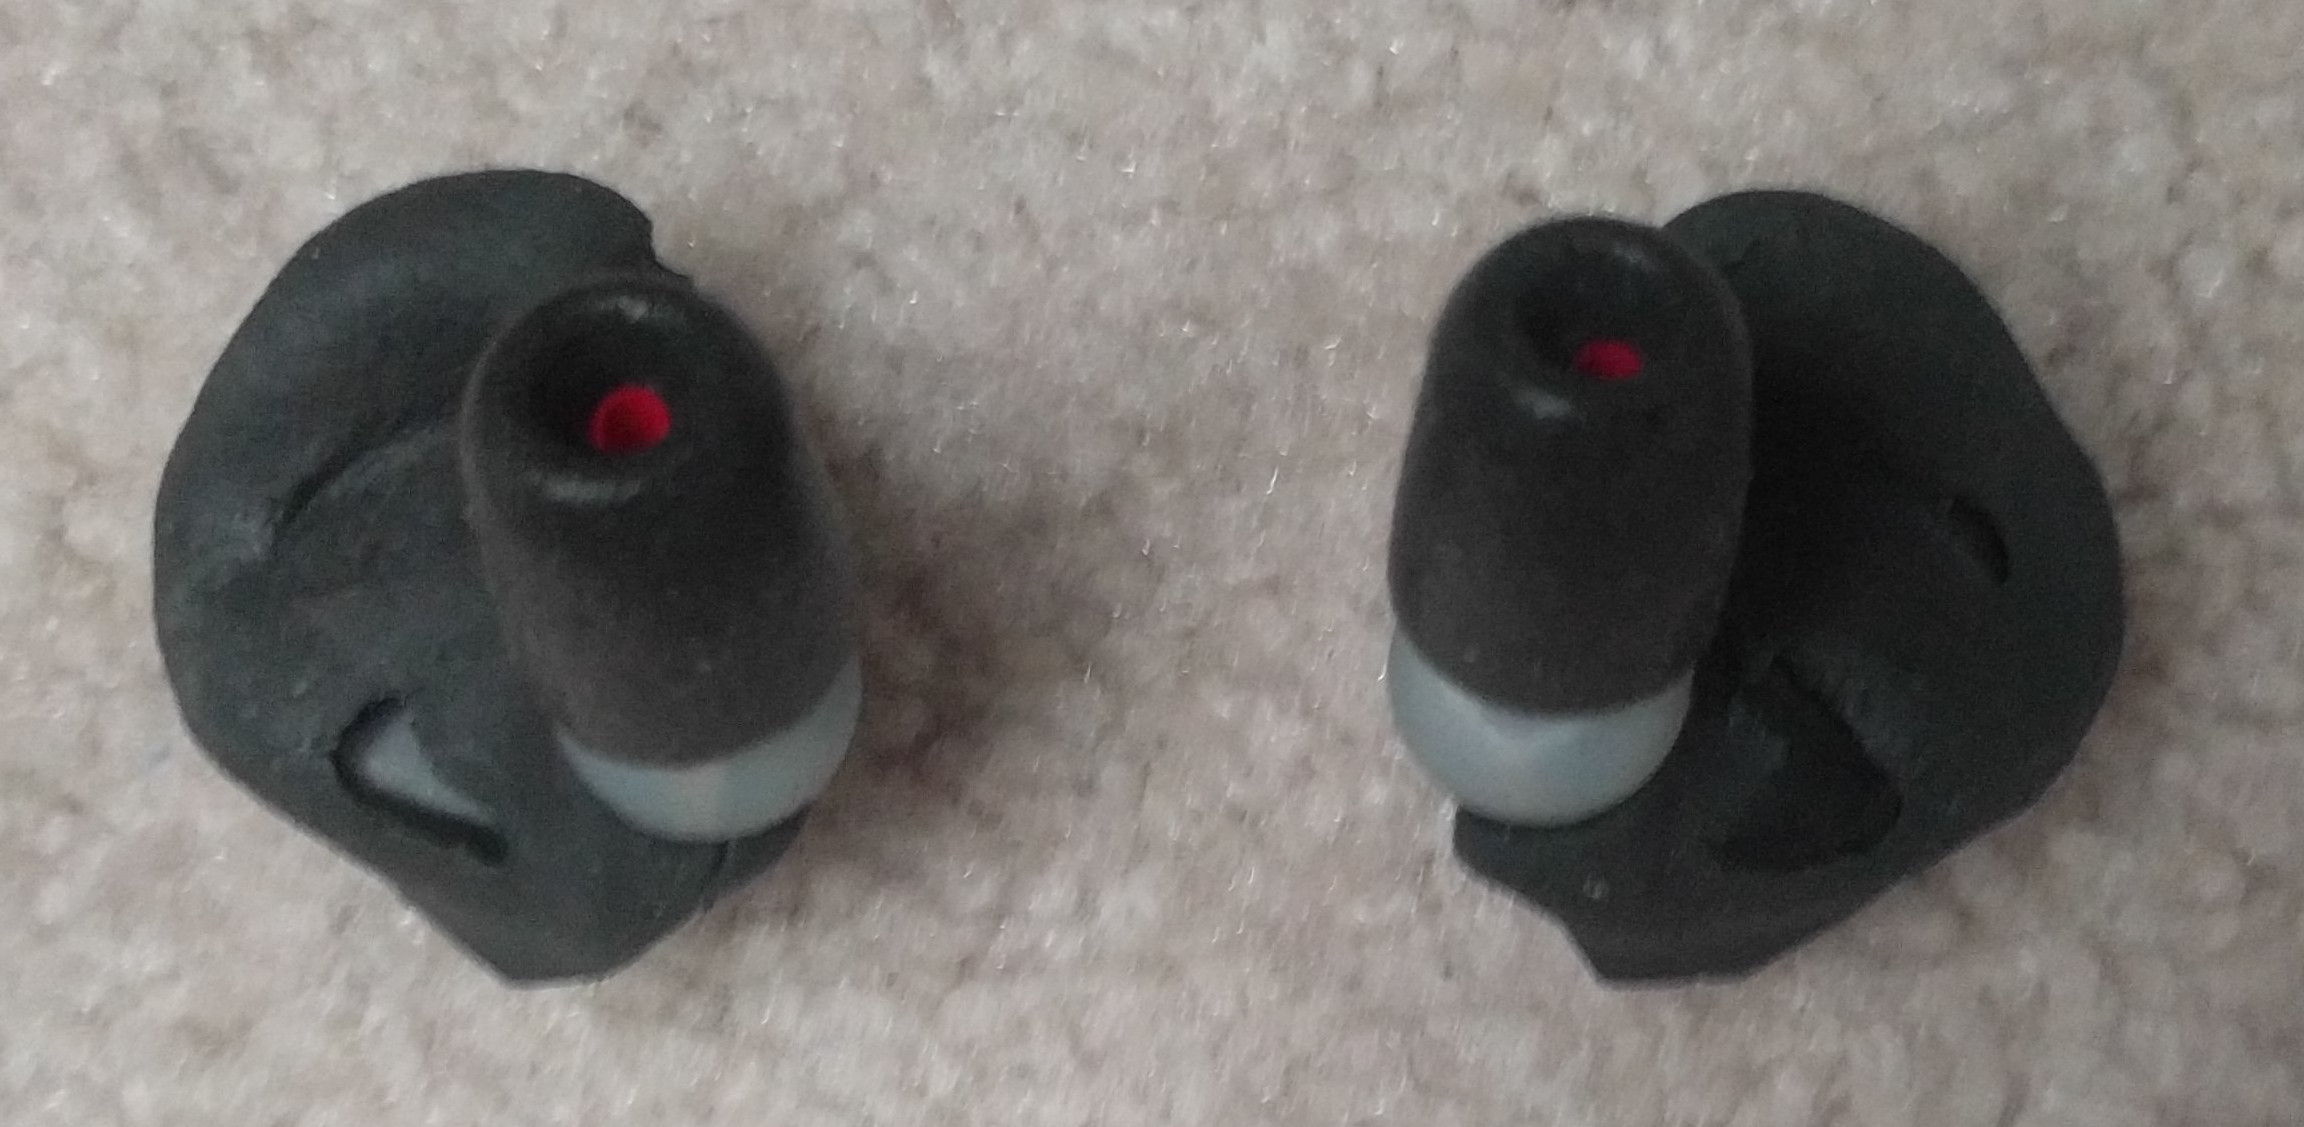
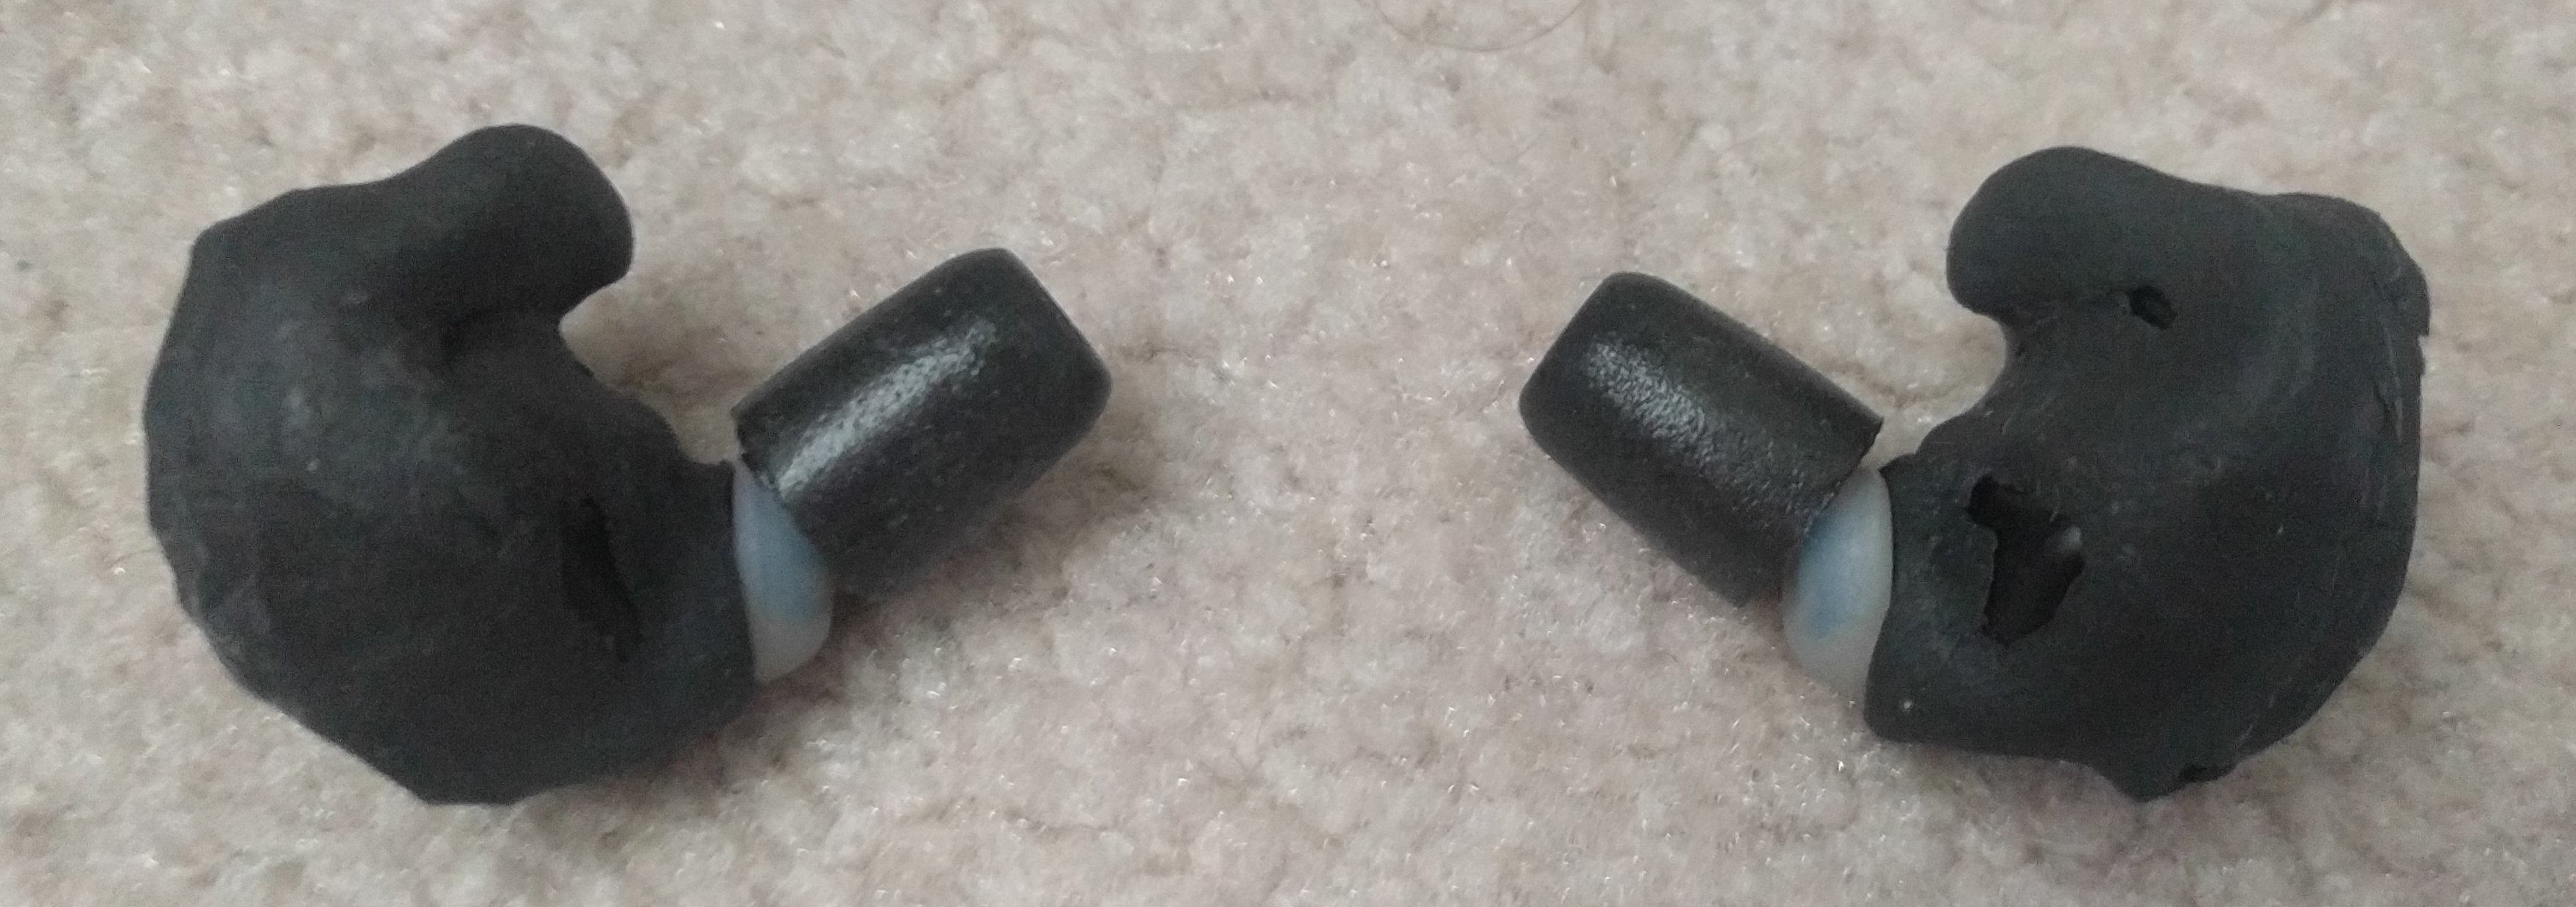
The 3D-printed adapter consists of a base that snaps onto the flange on the tip of the earbud and a nozzle that goes into the core of the Comply P-series tip, holding the two in the correct relative position and orientation to fit your ear. As mentioned above, my latest IQbuds2 MAX and Here One adapters also include a wide, rounded base that presses against the ear bones to tighten the fit. In a previous version of the Here One adapter and in the Dash adapter, the base is just large enough to cover the earbud tip.
To produce your own adapters, you can start with my CAD files (below), which have the correct shape of the base and the nozzle, but you will probably have to change the parameters that control the relative position and orientation of the base and nozzle to fit your own ears. Finding the right parameters is a guessing game; you should be prepared to go through several iterations to get an adequate fit. I initially had ear impressions made by an audiologist, hoping that by looking at the shape of the impressions compared to the earbuds, I could make a reasonable initial guess of the parameters. However, this didn't work very well, in part because the impressions don't extend as far into the ear canal as the Comply tips need to.
The other tricky issue with the adapter is that it needs to be tight enough on the flange of the earbud to get good noise isolation and not come off when you remove the earbud from your ear, but you need to be able to put the adapter on and off the flange repeatedly without wearing out either the adapter or the flange. For most of my time working with the Dash, I used Formlabs Tough Resin, which fit tightly at first but quickly wore down the flange to the point that no adapter would stay on the Dash. When I moved on to the Here One and IQbuds2 MAX, I used Formlabs Durable Resin, and after tuning the parameters, the adapters stayed on securely for months without significantly wearing down the flanges. This may be in part because the Dash flange is in the shape of a cone frustum, where the sharp edge easily gets worn down, while the Here One and IQbuds2 MAX flanges are cylindrical.
Important note: The latest version of the Here One model has a hole that typically comes out slightly too small to go on the earbud, although this can be affected by variations in fabrication. I've decided to leave it this way and scrape some additional material out of the hole in each adapter with a pocketknife until the adapter fits on the earbud, in the hope that I'll end up with a good fit regardless of variations in the adapters as fabricated. In my single order of IQbuds2 MAX adapters as of 2020-09-11, the adapters came out quite tight, but they have gone on and off the earbuds many times without damaging either, except that once I tried to pop an adapter off the earbud by pushing the foam tip (containing the nozzle) to the side and the nozzle broke off of the adapter base. To avoid this problem, the adapter can instead be removed by pulling the base away from the earbud, although that is significantly harder to do.
I designed the adapters using FreeCAD, which is quite buggy but has the advantage that others can get started on the project without the potential barrier of getting access to a licensed version of a commercial CAD tool up front. Start with the appropriate CAD file below.
All of these files are for my left ear, and I switch the side parameter in params_staging (see below) to mirror the design for my right ear.
If your ears have any asymmetry (which is likely), you will have to use different values of the other parameters for each ear as well.
(For the Dash, I eventually replaced the ridge with tabs in an attempt to make the Formlabs Tough Resin adapters go on and off the earbuds more easily. But if you are starting out with Formlabs Durable Resin, you are probably better off with the ridge, as my Here One and IQbuds2 MAX adapters have.)
All of the parameters you are likely to need are in a spreadsheet in the FreeCAD file. Since (as of 2016-07-02) FreeCad has no way to disable the recomputation of the whole document each time a spreadsheet cell is edited via the UI, and the recomputation was getting annoyingly slow, I set up separate params_staging and params_live spreadsheets, with almost all of the shapes defined by formulas in terms of params_live. You edit the parameters in params_staging and then run an update macro, which copies the parameters to params_live and then triggers a single recomputation. A second reason the macro is needed is that the design contains a spline (IIRC) and FreeCAD does not support assigning formulas to spline parameters, so the spline parameters are set by the macro. Place the appropriate macro in your user macro directory, typically ~/.FreeCAD/Macro/. When I worked on the IQbuds2 MAX model in July 2020, I started from the Here One update script and had to make significant changes before it would run at all, probably due to changes in FreeCAD, so if you want to use one of the scripts for the older earphones, you'll probably have to make changes too.
I approximated the shape of the tip of the Here One earbud as a stack of two elliptical cylinders with aligned axes: the larger one right at the tip is called "stage 2" and the smaller one closer to the body of the earbud is called "stage 1". The Here One adapter model uses a coordinate system with the origin at the center of the base of stage 1, the positive X axis along the major axis of the ellipse directed toward the top of the ear, and the positive Z axis along the cylindrical axis directed away from the body of the earbud. Since FreeCAD always uses a right-handed coordinate system, to have coordinates with similar meaning for both ears (which are mirror images to a first approximation), we define a coordinate "out" that equals positive Y for the left ear and negative Y for the right ear; the side parameter in params_staging controls this relationship. The positive "out" direction is roughly the back of the head. The adapter base is fixed in this coordinate system. The most important parameters control the position and orientation of the nozzle in this coordinate system:
nozzle_x and nozzle_out give the X and "out" coordinates of the intersection of the nozzle axis with the XY-plane.nozzle_dir_out controls the angle of the projection of the nozzle axis onto the XY-plane: 0 degrees is parallel to positive X, 90 degrees is parallel to positive "out", etc.nozzle_angle controls the angle of the nozzle axis from the positive Z axis.In the current Here One adapter, the wide base is simply centered around the earbud tip. That was the simplest to implement, and my ears happened to be flexible enough that the adapters would fit. However, it's conceivable that you might need to change the design of the base to get a proper fit.
The IQbuds2 MAX tip is similar except that there is a significant taper between the two elliptical cylinders. In the adapter model on this page, I used a frustum of an elliptical cone to fit that tapering. I had another version of the adapter model in which "stage 2" was approximated as a cylinder with a height that included the taper, leaving the hole in the adapter base with a sharper edge. I did not observe any difference in durability between the two versions, but I suspect the one with the taper may be slightly better and thus am recommending it here.
For the Dash adapter, I approximated the cross section of the earbud tip as circular and made a radially symmetric base. This means the base can rotate on the earbud tip, though for good noise isolation, it should be tight enough that it doesn't rotate freely. In that older design, I fixed the projection of the nozzle axis onto the XY-plane to be in the direction of positive X without loss of generality. Thus, the X axis no longer has a meaning relative to the earbud and there is no nozzle_dir_out parameter, but the other parameters described above have the same meanings in terms of the coordinate system.
I'm not going to take the time to document the rest of the structure of the models now. In particular, there may be some bug fixes or differences among the model versions above that I have forgotten to describe. Feel free to send me questions, and I will add the answers to this page as appropriate.
A common problem in editing the models is that changes to parameters change the edge structure of the drilled_body in a way that invalidates the definition of the joint_fillet. If this happens, the joint_fillet will not update and you'll see a small red error icon on it in the model tree. To iterate on the parameters, it may be easiest to hide the joint_fillet and just look at the drilled_body. When you're ready to update the joint_fillet, right-click it and choose "Edit fillet edges". One or both of the following may have happened:
joint_fillet may no longer correspond to the appropriate set of edges. To fix this: click "None" to clear the selection; choose "Select faces"; click the face of the nozzle nearest to the base; then mouse-over the edge between the face you just selected and the rest of the nozzle, note its number in the status bar, and deselect it in the list.drilled_body may make it impossible to generate a fillet with the original radius (I don't understand the semantics). Try reducing the fillet radius for some or all of the selected edges.When you are done changing the settings, click "OK" and see whether the error icon is gone. If not, you may not have reduced the radius enough or you may have hit a problem I haven't described here.
I recommend making the adapters out of Formlabs Durable Resin. As of 2020-11-10, the best manufacturing service I'm aware of for this is 3D Hubs. Their terms state that their service is intended for businesses and not consumers but (as far as I saw) do not actually prohibit consumer use, and they fulfilled my order with no questions asked. The pricing is reasonable (~$10/part) and the quality seems good. The only significant drawback is that the minimum order is $100. Better services may be available, but I didn't have the patience to conduct a comprehensive search.
You can expect it to take some force to put the adapters on and off the earbuds, but not a huge amount (I don't know how to be more precise). If it feels like the adapter is still significantly strained after it is all the way on the earbud, something is probably wrong. It's easy to accidentally break an adapter, so be sure to order spares in advance.
The mold that holds the earbud in the concha can be made with at home with a "make your own earplugs / ear molds" kit: you mix the molding material and press it into your ear, and it hardens into shape. I recommend the EZ-Form kit from Ear Plug Superstore (generally a good supplier), which is conveniently available in black (really a dark gray) to match the black earbuds. To make a mold:
One EZ-Form kit is good for two molds (so you can make one for each ear), but it may take a few tries to get a good mold, so you may want to buy two or three kits.
I've found the EZ-Form molds quite comfortable. The one problem I had with this kit is that the material sets really quickly: after about 30 seconds from the start of mixing, it would no longer join permanently when pressed together. So it's important to work quickly. I believe the material sets more quickly at higher temperatures, so once I even tried cooling my hands with ice water before beginning. As of 2016-10-08, after several weeks of deforming the molds as I put the earbuds in and out, they are starting to tear and I may soon need to make new ones. I also tried the Radians kit; it had a more reasonable setting time, but the molds came out uncomfortably stiff.
With the Here One, I had a significant problem with the molds going in and out of contact with the upper part of my concha as I moved, which was distracting and sometimes even painful. I solved this by applying the Silicote coating sold by Ear Plug Superstore to the molds (after the photos on this page were taken). The coating is slightly tacky and helps the mold stick to the ear all around to further improve the comfort and security of fit. The product is short on usage instructions. I just poured a little bit of the liquid into a small plastic container, held each mold with a tweezers, dipped each side into the coating (only the surfaces that touch the ear matter), and left the molds on a paper towel to dry. I judged the molds dry enough to use after about an hour or so, though they smelled bad for a day or two until the coating was completely dry.
Unfortunately, as of 2019-07-15, Ear Plug Superstore no longer sells this coating (their supplier has stopped supplying it and they have sold out their stock), the bottle I had has gone bad, and I haven't found a substitute that is available for purchase by the general public. Fortunately, I have not had the same "sticking and unsticking" problem with the uncoated IQbuds2 MAX molds; I don't know why.